
Developing a spigot plugin is easy, if you have used the Java programming language before. So, do you love playing Minecraft as I do? Are you a developer? There is a good chance that you are already running spigot as your server, which supports plugins using their own API. If you would like to develop your own plugin, you might get lost -- there is not much in the way of good tutorials. In this article, I will try to explain the basic components of spigot, how to set up your development environment and how to get started.
Terms and explanations
Before we get started, we need to clarify what we are dealing with. There are some terms you will need to know. This is due to the fact that Spigot actually consists of multiple modules and patch sets, which are combined to create the spigot.jar you are running your server with.Spigot
This is the main server component. It consists of a set of minecraft patches, the Bukkit API we are developing against and a Bukkit API implementation. You can get the Spigot server by downloading and running the build tools. The result will be a spigot.jar file, which can be executed instead of the standard server.jar.
Spigot API
There is also a Spigot API. As it is nearly the same as the Bukkit API with just a few extras, I’m not going to cover this API in the tutorial. If you need special methods like modifying arrows, check out the spigot API. Otherwise, go for Bukkit, as this will also run on other servers. When I refer to Spigot plugin in this article, I usually mean Bukkit plugin instead, because I use the Bukkit API.
Bukkit API
This is the actual API we need. Now is a good time to open and bookmark the API javadocs. You might also want to configure your IDE to download these javadocs, as you are going to implement against this API.
[caption id="attachment_6020" align="aligncenter" width="859"]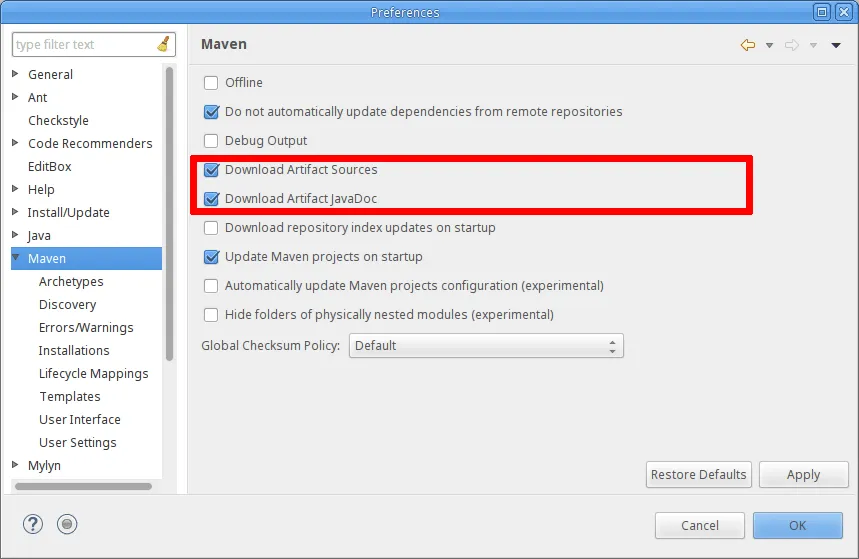
As you can see in the screenshot above, those two checkboxes are checked in my settings. It really helps a lot, because on hovering over a method or a class you get some very useful advice via javadoc popup.
CraftBukkit
This is the actual implementation Spigot uses for the Bukkit API. We don’t need to care much about this jar file, which is also being created by the spigot build tools. It is included in the spigot.jar (a so called »fat jar«).
ProtocolLib
It will not take long, until you will see some shortcomings with the Bukkit API. For example, while you can easily change the contents of a sign on certain events, you cannot easily make the sign show specific contents to specific users at the same time. This is where ProtocolLib comes in. It provides multiple Bukkit-Events which are dealing with packages sent over the network. If you manipulate these packets, you can modify data for a specific player.
Sonatype Nexus (Repository)
The Nexus is a product by Sonatype. It is the most used maven artifact repository for self-hosting. With this software, you can host your own maven artifacts so you can add them in projects as a dependency. Spigot has it's own nexus, so you don't need a repository yourself. The current spigot artifacts are uploaded to the nexus, so you can use them easily in your projects.
Development environment: Setting all up
Maven setup: Spigot Plugin-Repository
Both Spigot and Bukkit are created using maven. So maven is a good choice to start your project with. If you don't know maven, you should read some tutorials right now, because the following sections will require basic knowledge of maven. I skip the process of setting the source and target JRE version, as well as source file encoding -- see this commit on how to set those properties up correctly.
To get started, create an empty pom.xml file as you would always do. To pull the Bukkit API into your project, you need to specify the maven repository, since the bukkit API is not in maven central. Instead, you can find it hosted on hub.spigotmc.org (bookmark this if you haven't done so yet!). The snippets you need to insert are as following:
<project xmlns="http://maven.apache.org/POM/4.0.0" xmlns:xsi="http://www.w3.org/2001/XMLSchema-instance"
    xsi:schemaLocation="http://maven.apache.org/POM/4.0.0 http://maven.apache.org/xsd/maven-4.0.0.xsd">

    <dependencies>
        <dependency>
            <groupId>org.bukkit</groupId>
            <artifactId>bukkit</artifactId>
            <version>1.9-R0.1-SNAPSHOT</version>
            <scope>provided</scope>
        </dependency>
    </dependencies>

    <repositories>
        <repository>
            <id>Bukkit</id>
            <url>https://hub.spigotmc.org/nexus/content/repositories/snapshots/</url>
            <snapshots>
                <enabled>true</enabled>
            </snapshots>
            <releases>
                <enabled>false</enabled>
            </releases>
        </repository>
    </repositories>
</project>
Now, of course you will need all the other standard tags as well, like artifactId , groupId and <version> . But I will leave this to you, as you should have some basic knowledge anyway. If you came here to convert your existing project to maven, this should suffice.
As you can see, we pulled a snapshot jar. This is because at the time of writing these lines, there was no final 1.9 Bukkit API available. If you need to update the spigot API, be sure to check out the latest on spigots nexus as seen in the screenshot.
[caption id="attachment_6010" align="aligncenter" width="622"]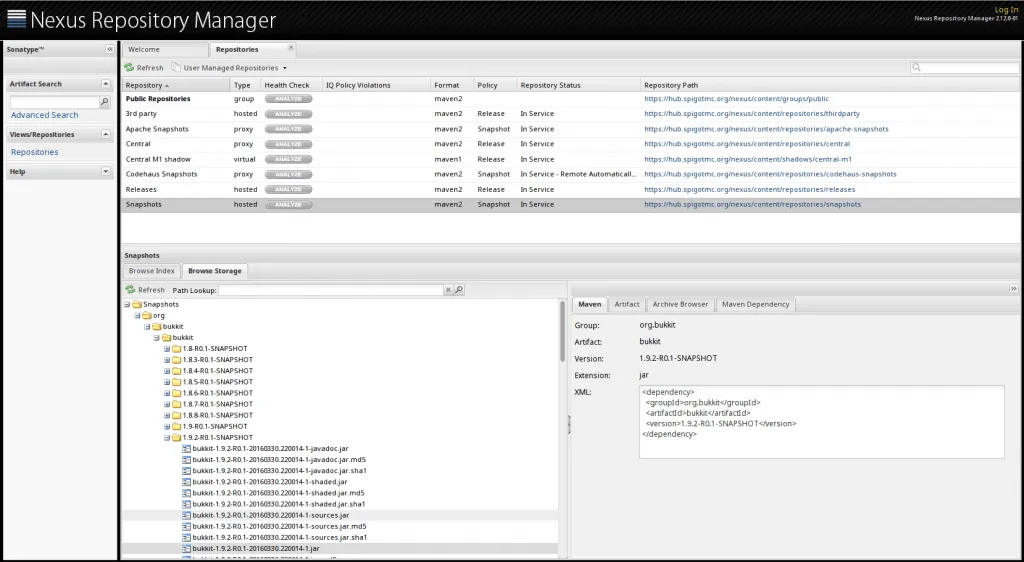
Now, if you run mvn clean test , you should see maven collecting the mentioned dependency. Now we are ready to go for development!
Spigot plugin.yml configuration file
As we know from maven, resources will go into the folder <projectroot>/src/main/resources . You need to create a file named plugin.yml which will contain the information spigot will parse to be actually able to load your plugin.
# If you would like to change the commands to something else, this can be done in the commands.yml file.
# View this page for help on adding command aliases: http://wiki.bukkit.org/Commands.yml
name: PluginName.
description: A description for your plugin will go here. No quotes needed.
main: de.package.plugin.classname
version: Plugin version
author: your name
website: github.com/yourname/repository
depend:
  - ProtocolLib
In the above example file, which can be found on github, we specify some necessary and some optional (but highly recommended) variables.
- name -- the name of the plugin. This is also displayed in loggers. Also used for dependencies.
- main -- the package and class name of your main plugin java class.
- version -- the plugin version.
- description -- although stated as optional, highly recommended, as an absent key (not value) will cause a NullPointerException.
- author -- obiously, your (nick) name.
- website -- put in where we can find more information.
- depend -- this is a little bit special. If your plugin depends on others, this list makes sure your plugin is loaded AFTER the mentioned plugins -- or not at all, if one is missing.
- softdepend -- not listed above, but you can also have soft dependencies and cut your features if a listed plugin is not available.
The Spigot plugin main class
After we defined the name of our main class, we can start coding! For brevity, I will leave out any imports and package names where they are redundant or just not needed for clarity. Adjust for your own spigot plugin.
The main class without functionality is actually quite short:
public class ExamplePlugin extends JavaPlugin {

  @Override
  public void onDisable() {
  }

  @Override
  public void onEnable() {
  }

}
Well, that's it! In the case you specify this class in your plugin.yml, you have a working plugin which can be built using the command mvn package . Hooray! :-)
About events and listeners
Now, when anything happens in minecraft, you will want to modify something with your spigot plugin. So, for example, if the player teleports, you might want to log or to undo his action. But when does a player actually teleport? Don't ask bukkit, it will tell your spigot plugin when something happend using events. The only thing you need to do in your spigot plugin is to create a listener. A Listener is the counterpart of an event: It gets called, as soon as something (the event) happens.
There are a few of events predefined in spigot/bukkit. Common events you might want to listen to are the BlockBreakEvent (a block is destroyed) or the EnchantItemEvent (an item is being enchanted). For more events, just check out the event packages (there are a few). But we are interested in the PlayerTeleportEvent. To implement a listener, we need to implement the Interface org.bukkit.event.Listener . Be sure to implement the correct interface, there are more then one Listener classes!
The listener class has no methods you must implement. Spigot works by using annotations (those @-prepended keywords). So, if we want to specify an event we are listening to, we need to create a public void method (usually called on plus the event name) annotated with @EventHandler .
/**
 * React on player teleport events.
 *
 * @since 0.0.1.
 */
public class PlayerTeleportListener implements Listener {

  @EventHandler
  public void onPlayerTeleport(PlayerTeleportEvent event) {
    // TODO: do something!
  }

}
This is a working example of a fully functional listener. It doesn't do anything, but we will discuss that later.
Registering Listeners in your spigot plugin
We created a listener. Now what? Spigot will not know about your listener yet. You need to explicitly tell spigot that you like to be informed about those events. This is usually done in the main spigot plugin class. If you have a lot of events, be sure to create a separate method, so your onEnable() method won’t clutter!
@Override
  public void onEnable() {
    // 1.) init your config.

    // 2.) register events.
    registerEvents();
  }

  private void registerEvents() {
    Bukkit.getServer().getPluginManager().registerEvents(
        new PlayerTeleportListener(), this);
  }
As you can see, registering events (commit on GitHub) is straight-forward. The only downside is that spigot uses a static main class. I don’t like this coding style, but since this is an API, we have no choice here.
Now we can fill our Listener with live!Undo teleport -- using the Bukkit API
Now it is time to implement the actual functionality. Let’s go back to PlayerTeleportListener.java class file. For this to happen, we have two options: Cancel (i.e. stop) the PlayerTeleportEvent, or just teleport him back.
Canceling an event
It is possible to cancel almost any event with the event.cancel() method. The code is pretty straight forward (commit):
public class PlayerTeleportListener implements Listener {

  @EventHandler
  public void onPlayerTeleport(PlayerTeleportEvent event) {
    event.setCancelled(true);
  }

}
Some events are actually called before the actual action happens. This is not the case for the teleport event. From the Java Docs:
If a move or teleport event is cancelled, the player will be moved or teleported back to the Location as defined by getFrom(). This will not fire an event. Source: PlayerTeleportEvent (extends PlayerMoveEvent)Okay, what does that mean? it means the following:
- The player is teleported to the destination in the first place. You cannot prevent this.
- The player is teleported back to the old location. You can get the Location object by calling event.getFrom() .
- The back-teleport will not fire an additional event. The emphasis is very important here. Imaging the cancellation fired an additional event -- you wouldn’t know it is a back-teleport from a cancellation and thus teleport him back again. And again. And again. See?
- This does not prevent you from fireing an additional, user-defined event (like TeleportCancelledEvent).
Undoing the teleport yourself
Now, as we know from above, there is a event.getFrom() event. This way we can figure out how to teleport the player back. The event has also a method which gets the Player for us. The player object, in return, has a teleport method. This is actually all we need.
@EventHandler
  public void onPlayerTeleport(PlayerTeleportEvent event) {
    // if this event was cancelled, why bother?
    if (event.isCancelled()) {
      return;
    }

    // Undo all teleports manually.
    Player teleportedPlayer = event.getPlayer();
    Location origin = event.getFrom();
    event.getCause();

    boolean teleportSuccess = teleportedPlayer.teleport(origin);
    // TODO: log teleportSuccess;
  }
We also check if the event was cancelled. Otherwise the player might get teleported twice to the same location. It would probably not hurt (I didn’t try it, I confess), but why bother? Also note that you can log the success or fire other events if the backteleport failed.
Undoing only certain teleports in your spigot plugin
The API is quite feature-complete. It also allows us to undo only certain teleport events. For example, you can find out what caused the teleport in the first place, which is an enum. Let’s say, you want to undo enderperl teleports. All we need to do is to listen for that cause:
@EventHandler
  public void onPlayerTeleport(PlayerTeleportEvent event) {
    // if this event was cancelled, why bother?
    if (event.isCancelled()) {
      return;
    }

    // If this is not an ender teleport, don't bother.
    if (!TeleportCause.ENDER_PEARL.equals(event.getCause())) {
      return;
    }

    Player teleportedPlayer = event.getPlayer();
    Location origin = event.getFrom();

    boolean teleportSuccess = teleportedPlayer.teleport(origin, TeleportCause.PLUGIN);
    // TODO: log teleportSuccess;
  }
Also note, that we added a new TeleportCause (the teleport method is overloaded). Since the teleport method will fire a new teleport event, other plugins might want to cancel that teleport as well on certain conditions (e.g. if they have some special permissions).
Creating your own TeleportUndone-Events
Speaking of other plugins interacting with ours: You might want to notify them in a more proper way. So let’s not fire a new PlayerTeleportEvent, but instead just cancel the event (which does not fire a new PlayerTeleportEvent by itself). But how will other plugins know that a teleport was cancelled? It might just want to listen to cancelled PlayerTeleportEvents, but there is more to it. Perhaps you will want to add more, or more specific causes. This is where custom (i.e. user defined) events come in handy.
import com.google.common.base.Optional;

/**
 * A Teleport Cancelled Event.
 *
 * <p>
 * Probably not actually useful, but works as an example.
 * </p>
 */
public class PlayerTeleportCancelledEvent extends PlayerTeleportEvent {

  private Optional<String> reason = Optional.absent();

  public PlayerTeleportCancelledEvent(Player player, Location from, Location to, String reason,
      TeleportCause cause) {
    super(player, from, to, cause);
    this.reason = Optional.fromNullable(reason);
  }

  public Optional<String> getReason() {
    return this.reason;
  }

  @Override
  public String toString() {
    return "PlayerTeleportCancelledEvent [reason=" + reason.or("No reason defined")
        + ", getCause()=" + getCause().toString()
        + ", getPlayer()=" + getPlayer().getUniqueId() + "/" + getPlayer().getName() + "]";
  }

}
Extending the existing PlayerTeleportEvent in our spigot plugin makes it easy to add just a single field. Also note that I used an optional to supply a reason. If no reason is given, we have null-safe operations. For this to work you need either Guava (which is a dependency of Spigot) or Java 8. I decided to use Guava’s Optional, because this way the code will run on Java 1.6 and Java 1.7 servers, too.
Now, this event is never being called. So even if another spigot plugin was listening to it, there were no way the EventHandler would actually ever get called. So, let’s just call the new event.
/**
 * React on player teleport events.
 *
 * @since 0.0.1.
 */
public class PlayerTeleportListener implements Listener {

  @EventHandler
  public void onPlayerTeleport(PlayerTeleportEvent event) {
    // if this event was cancelled, why bother?
    if (event.isCancelled()) {
      return;
    }

    // If this is not an ender teleport, don't bother.
    if (!TeleportCause.ENDER_PEARL.equals(event.getCause())) {
      return;
    }

    event.setCancelled(true);

    // Call the event cancelled event to notify others.
    PlayerTeleportCancelledEvent ptce = new PlayerTeleportCancelledEvent(event.getPlayer(),
        event.getFrom(), event.getTo(), "You may not throw ender pearls!!", event.getCause());
    Bukkit.getServer().getPluginManager().callEvent(ptce);
  }

}
You might notice that we are just injecting one new field into the event, which is the reason field. Afterwards, we call the callEvent(event) method, which will notify all listeners registered to this event. If you want to see the modifications on github, click here.
Creating a configuration
No plugin is complete without at least a little bit of configuration. Whether this is a database configuration, language or just switching some functions on or off -- if will be needed very soon. Luckily, spigot ships with the terrific snakeyaml library and some useful methods in the JavaPlugin class we already extended earlier.
config.yml -- the default configuration
Creating a default config.yml file is very easy. Just create it in your src/main/resources folder of your project. If you are not familiar with yaml (which I doubt if you read up to this section), I can recommend this reading.
Creating a config class
There are two basic rules you need to obey:- Include the logger in your configuration.
- Don’t stringify the configuration.
Lets get started then. All we need to do is to create a method which will read the default config.yml and parse its values. Other than that, it’s a simple POJO, github commit here.
cancel:
  # Choose which teleport to stop. Possible values:
  # - ENDER_PEARL (throwing an ender pearl).
  # - PLUGIN (caused by a plugin).
  # - COMMAND (like /tp or others).
  # - SPECTATE (disables spectator functionality).
  # - UNKNOWN (disables teleports with unknown causes).
  # Note: Any other value will disable the functionality.
  cause: ENDER_PEARL
Now, this config shouldn’t be suprising in any way. We are defining a cancel object, which has an attribute cause. the attribute’s value is one of the teleport causes we saw earlier in the TeleportCause() -enum.
public class ExamplePluginConfig {

  private final Logger logger;
  private FileConfiguration config;
  private final JavaPlugin plugin;

  private Optional<TeleportCause> teleportCauseToCancel = null;

  /**
   * Creates a Plugin config for this plugin.
   *
   * @param plugin
   *          enter <i>this</i> from your main class.
   */
  public ExamplePluginConfig(final JavaPlugin plugin) {
    this.plugin = plugin;
    this.config = plugin.getConfig();
    this.logger = plugin.getLogger();

    reloadConfig();
  }

  /**
   * Force reload the config.
   */
  public void reloadConfig() {
    plugin.reloadConfig();
    this.config = plugin.getConfig();

    String cancelCause = config.getRoot().getString("cancel.cause");
    this.teleportCauseToCancel = Enums.getIfPresent(TeleportCause.class, cancelCause);
  }

  public Logger getLogger() {
    return logger;
  }

  public FileConfiguration getConfig() {
    return config;
  }

  public JavaPlugin getPlugin() {
    return plugin;
  }

  public Optional<TeleportCause> getTeleportCauseToCancel() {
    return teleportCauseToCancel;
  }

}
Please note how we can reload the config at any time using the public reloadConfig() method. But more important, watch the getTeleportCauseToCancel() -method. It is returning an Optional , not a String. This way, we can intercept invalid settings! The Enums import is also very important, because it will create an optional just out of a string for us. So in any case, be sure to return the correct target type, not just a string you need to convert every time! I see this coding style often (config.getString("cancel.cause")… in a listener), but this is plain ugly, repetitive, and harder to read and to understand. So, please, convert as early as possible into the target type object.
Letting your Listeners and events know about the config
This is probably the most important part of this tutorial. I saw almost every plugin making it wrong: They just created a new config instance, which caused them the config to be reloaded on instantiation. This will also prevent listeners from participating in a reload command you might want to implement. So, let it make right the first time. Actually, we just need to change the constructor. We start with the already prepared main plugin class:
/**
 * The example plugin main class.
 *
 * @since 0.0.1-SNAPSHOT.
 */
public class ExamplePlugin extends JavaPlugin {

  private ExamplePluginConfig config = null;

  @Override
  public void onDisable() {
  }

  @Override
  public void onEnable() {
    // 1.) init your config.
    this.config = new ExamplePluginConfig(this);

    // 2.) register events.
    registerEvents();
  }

  private void registerEvents() {
    Bukkit.getServer().getPluginManager().registerEvents(
        new PlayerTeleportListener(config), this);
  }

}
Note that we changed only three lines of code. That is not much. But we have to create a new constructor. Our modified PlayerTeleportListener looks like this:
/**
 * React on player teleport events.
 *
 * @since 0.0.1.
 */
public class PlayerTeleportListener implements Listener {

  private ExamplePluginConfig config = null;

  public PlayerTeleportListener(final ExamplePluginConfig config) {
    this.config = config;
  }

  @EventHandler
  public void onPlayerTeleport(PlayerTeleportEvent event) {
    // if this event was cancelled, why bother?
    if (event.isCancelled()) {
      return;
    }

    if (!config.getTeleportCauseToCancel().isPresent()) {
      // No event defined which could be cancelled.
      return;
    }

    TeleportCause cancelCause = config.getTeleportCauseToCancel().get();

    // If this is not a configured teleport cause, so don't bother.
    if (!cancelCause.equals(event.getCause())) {
      return;
    }

    event.setCancelled(true);

    // Call the event cancelled event to notify others.
    PlayerTeleportCancelledEvent ptce = new PlayerTeleportCancelledEvent(event.getPlayer(),
        event.getFrom(), event.getTo(), "You may not throw ender pearls!!", event.getCause());
    Bukkit.getServer().getPluginManager().callEvent(ptce);
  }

}
A few lines more have changed -- but still, it is not a lot., see the whole commit.
Thats it for this tutorial. But wait! There is still one thing to learn -- unit testing!
Unit Testing the spigot plugin
Now, does it work? Do you know? I do, because I wrote unit tests in the background and just didn’t commit them yet. And there is a reason for this: Unit tests are complicated with Bukkit, because Bukkit uses a lot of final classes and static methods. That is just a pain in the neck. Especially if you want to see which lines you actually covered -- EclEmma (for Eclipse users) and Sonar would fail finding these lines resulting in 0% coverage. But there is a way to fix this.
(Power)Mocks everywhere!
To get started, we (sadly) need PowerMock in some tests. PowerMock is kind of an extension to both Mockito and JUnit. You can also use EasyMock instead of Mockito, but Bukkit has a dependency on Mockito already, so let’s just use that. It is not a bad choice anyway. You will need the following pom.xml modifications:
<dependencies>
        …
        <dependency>
            <groupId>org.powermock</groupId>
            <artifactId>powermock</artifactId>
            <version>1.6.4</version>
            <type>pom</type>
            <scope>test</scope>
        </dependency>
        <dependency>
            <groupId>org.powermock</groupId>
            <artifactId>powermock-api-mockito</artifactId>
            <version>1.6.4</version>
            <scope>test</scope>
        </dependency>
        <dependency>
            <groupId>org.powermock</groupId>
            <artifactId>powermock-module-junit4</artifactId>
            <version>1.6.4</version>
            <scope>test</scope>
        </dependency>
        <dependency>
            <groupId>org.powermock</groupId>
            <artifactId>powermock-module-junit4-rule</artifactId>
            <version>1.6.4</version>
            <scope>test</scope>
        </dependency>
        <dependency>
            <groupId>org.powermock</groupId>
            <artifactId>powermock-classloading-xstream</artifactId>
            <version>1.6.4</version>
            <scope>test</scope>
        </dependency>
  </dependencies>
We need the junit4-rules so JUnit can tell the difference between a mocked (faked) object and the true object. If it couldn’t, JUnit would not recognize the mock object as the same type as the original one. That is the reason why we had 0% coverage without these rules.
Testing the config
Let’s geht started with writing our first unittest. When you start, you will want to instantiate you JavaPlugin first, because this is needed as a constructor parameter for the ExamplePluginConfig -class. Sadly, the extended JavaPlugin-class has a constructor which forbids instantiating outside the Spigot server. This means, we need to mock it. A basic setup looks like this:
public class ConfigTest {

  private static final Logger LOG = Logger.getLogger("ConfigTest");

  private ExamplePluginConfig epc;

  @Before
  public void setUp() throws FileNotFoundException, IOException, InvalidConfigurationException {
    ExamplePlugin exPl = Mockito.mock(ExamplePlugin.class);

    File configfile = new File(getClass().getResource("/config.yml").getPath());
    LOG.info("Using config file [" + configfile.getAbsolutePath() + "].");
    YamlConfiguration configuration = new YamlConfiguration();
    configuration.load(configfile.getAbsolutePath());
    Mockito.doReturn(configuration).when(exPl).getConfig();
    this.epc = new ExamplePluginConfig(exPl);
  }

  @Test
  public void testCreateConfig() {
    Assert.assertTrue(epc.getTeleportCauseToCancel().isPresent());
    Assert.assertEquals(TeleportCause.ENDER_PEARL, epc.getTeleportCauseToCancel().get());
  }

}
Please note that we can use a default logger or even log4j if you like. But as the plugin logs, staying with JUL is a sane choice. PowerMockito is not needed yet. If you like, take a look at the whole commit and try yourself.
We need our mocked ExamplePlugin to return something other than null if we call getConfig(). Besides, the configuration can only be instantiated if the plugin returns a valid config file. Thus, we use the class loader to access the config.yml, which is in the resource root path, build a configuration using snakeyml, and make it the return value on exPl.getConfig().
The actual test is just trying to read the config file, which actually tests our getTeleportCauseToCancel() method from the config. As said, the configuration should always return Objects, not Strings (i.e. not "ENDER_PEARL").
Testing the listeners
Testing the listeners is a little more complex. Remember this line in our listener? We have an obvious null pointer exception:
Bukkit.getServer().getPluginManager().callEvent(ptce);This actually means we have to mock the server class. And a whole PluginManager? No. Imagine, you called the onPlayerTeleport() method. It has got a void return, so does its callEvent() method. A smart idea would be to implement the callEvent() method in a way, that we can receive the called event later. This is actually possible! When you create a class which implements PluginManager, just add these lines:
/**
 * Pluginmanager, which saves events to a map.
 */
public class ListingPluginManager implements PluginManager {

  private List<Event> eventsCalled = Lists.newArrayList();

  /* (non-Javadoc)
   * @see org.bukkit.plugin.PluginManager#callEvent(org.bukkit.event.Event)
   */
  @Override
  public void callEvent(Event event) throws IllegalStateException {
    if (null == event) {
      throw new IllegalStateException("Event is null!");
    }

    this.getEventsCalled().add(event);
  }

  public List<Event> getEventsCalled() {
    return eventsCalled;
  }

}
Can you imagine what happens, if you called a event now? Right, is is added to a list we can recieve using getEventsCalled() . The test now needs to be constructed and set up.
@PrepareForTest({ Bukkit.class, ExamplePlugin.class })
public class TeleportListenerTest {

  private static final Logger LOG = Logger.getLogger("TeleportListenerTest");

  private ExamplePluginConfig epc;

  private PlayerTeleportListener tpListener;

  @Before
  public void setUp() throws FileNotFoundException, IOException, InvalidConfigurationException {
    ExamplePlugin exPl = PowerMockito.mock(ExamplePlugin.class);

    File configfile = new File(getClass().getResource("/config.yml").getPath());
    LOG.info("Using config file [" + configfile.getAbsolutePath() + "].");
    YamlConfiguration configuration = new YamlConfiguration();
    configuration.load(configfile.getAbsolutePath());
    Mockito.doReturn(configuration).when(exPl).getConfig();
    this.epc = new ExamplePluginConfig(exPl);

    tpListener = new PlayerTeleportListener(epc);

    PluginManager pm = new ListingPluginManager();

    PowerMockito.mockStatic(Bukkit.class);
    Server server = PowerMockito.mock(Server.class);
    PowerMockito.doReturn(pm).when(server).getPluginManager();
    Mockito.when(Bukkit.getServer()).thenReturn(server);
  }
}
Now, this wouldn’t work. We need to have the PowerMockitoRunner.class . As this would interfere with sonar or eclemma, we can use a JUnit rule instead. Just add this field:
@Rule
  public PowerMockRule rule = new PowerMockRule();
This done, let’s test our listener.
public class TeleportListenerTest {
  …

  @Test
  public void test() {
    PlayerTeleportEvent event = new PlayerTeleportEvent(null, null, null,
        TeleportCause.ENDER_PEARL);

    Assert.assertNotNull(
        ListingPluginManager.class == Bukkit.getServer().getPluginManager().getClass());
    ListingPluginManager truePm = (ListingPluginManager) Bukkit.getServer().getPluginManager();
    Assert.assertEquals(0, truePm.getEventsCalled().size());

    tpListener.onPlayerTeleport(event);

    Assert.assertEquals(1, truePm.getEventsCalled().size());
    Event called = truePm.getEventsCalled().get(0);
    Assert.assertTrue(PlayerTeleportCancelledEvent.class == called.getClass());
  }
}
I omited the other part for brevity. But what is going on here?
- First of all, we need to see if we cought the correct implementation -- this is optional. The pluginmanager’s class is compared to our ListingPluginManager.class , which should be the same as it was mocked in the set up method. Afterwards, we can cast it safely.
- The next comparison will check if there are currently no events in the List. There should not be any, as we didn’t fire any events yet.
- In the third paragraph, we are firing an event. As we don’t access any of the player or location fields, we can safely use nulls here.
- In the last paragraph, we are checking if there is an event now in the List, which should be. Then we get the event and check if it is a PlayerTeleportCancelledEvent -- something, that only we could have created at this point.
Run this test, and we get no errors! We are done! I guess you can figure out how to test your Events yourself. Please be aware that such a list may now work in additional unit tests, as the static Bukkit class may overwrite other »instances«, unless you fork your tests in their own JVMs.
DOs and coding sugar
As we didn’t cover everything in this tutorial, here are some general tips for your spigot plugins. Some of them apply only to spigot plugins, but others are general java tips which will help you in various ways.Using packages for your classes
The example spigot plugin has predefined packages for events and listeners. Also create one for threads and so on. It is a good habit to put the corresponding classes into these packages, as they will be easier to find. Just think of your plugin growing, and contributors cannot find the relevant part in your code.
One event, one class
It is very tempting to define a super event which can have various states and mean a lot. But instead of having a super event, create a few small events, if the differences can not be done with fields easily.
One listener, one class
If you are creating listeners, be sure to only have one @EventHandler in your class, unless you have a very good reason to do otherwise! Sometimes you might even have to listeners for the same event twice or multiple times, because independent actions may need to be executed for the very same event. That is just fine. In my ExperienceBank3-Plugin, I got five Listeners on PlayerInteract -- just to see which item was clicked in which manner.
Create objects for your config items
If your config contains lists, numbers and enumerations, don't just return strings. When loading your config, be sure to create objects and cast the contents and return proper types. Thus, your getDatabasePort() method should return an int . Your DatabaseType configuration item might return an ENUM instance. And so on. Have one place where you do convert strings into objects: The config.
Handle the config to all your methods, listeners etc.
Your config should know the logger, the plugin etc. This said, your config can use the logger from your plugin class, if you use the plugin config as a parameter. If you need a logger in other classes, just pass your ExamplePluginConfig in the constructor and use its getLogger() method.
Do use findbugs
Probably you forgot to close a database session, there is a possible NullPointerException waiting, or you just didn’t use some objects how they were designed to. Findbugs is a great eclipse and/or maven plugin, which will help you find a lot of those bugs, even before you submit your code to sonar.
Do use sonar
After checking your code with findbugs, you might want to upload it to your private sonar instance. It will give you a very nice graphic of your code and what’s wrong with it (or not). So if your wrote new code, it will tell how much of it is covered by unit tests. There are also checks for complexity and other things which are part of findbugs, but some of them are not (like coverage). To see your code evolve and even more tips, I'd definitely recommend to use sonar!
[gallery columns="2" link="file" ids="6012,6013,6014,6015"]As you can see in the screenshots, my plugin is not perfect either at the time of writing. But I did fix every issue which is not related to unit testing, and there are some unit tests which cover the most important classes (calculating experience). I'd recommend to do the same in your project as well. After all, we all love those graphs, don’t we?
Do use checkstyle with Google’s Java style
When you can use a guide given by Google you just take it with both hands and say “thank you”. -Refael Dakar
A consistent programming style does not only help you to understand your own code months or years later, it also encurages other developers to contribute to your spigot plugin. Of course, they should use the same style checks. For easiness, start with Google Checks, as they are the most modern checks delivered with checkstyle and thus are available everywhere.
Do use maven
Dependencies are hard to manage by oneself. Did you know you can use Google Guava for your spigot plugin? Maven will tell you so. You wouldn't know if you copied the .jar file to your lib folder yourself. Also, if the Bukkit devs decide to remove that dependency and you are not using maven, your spigot plugin will be broken without letting you know. If you use maven on the other hand, you will notice at compile time.
Don’ts and code smells
Don’t use Logger.getLogger();
Your plugin has a getLogger() method. This means, you should use it. If you use Logger.getLogger() anywhere, you will not have that prefix, which might change in later spigot versions. It is easy to handle the logger to your config, so be sure to do so.
Don’t stringify the configuration
Don’t just return string objects from your config.yml file. Instead, convert them into something useful or fail fast: If the databaseport is not a number, fail in the onEnable() method when your config is instantiated, Not any later!
Don't indent more then three levels
[…] if you need more than 3 levels of indentation, you're screwed anyway, and should fix your program. -Linus TorvaldsThis is a very general and also very good and helpful suggestion. If you now ask: »How can this be done? This is impossible?!«. No, it is not. Here are some basic strategies:
- Instead of testing if a requirement is fulfilled, test if its not. If so, use continue or return to jump out.
- Avoid else . Eithter use return/continue in your if, or extract the test to a method.
- Avoid duplications. If you see yourself doing the same tests twice, refactor. Extract the test to its own method.
That said, you will be able to avoid a lot of indentation. This might actually lead to a lot of if-not-then-returns in the beginning of your methods, but that does not hurt. It is still easier to read! Also, Linus Torvalds said you can't code if you use more than three levels of indentation.
Don't release without unittests
If you want to protect yourself from bad ratings and lots of bad comments, be sure that every single line of your most important classes were tested! You will still have bugs which you weren't able to test (some server specific side effects, unwanted behaviour, etc.), but you will also save yourself a lot of painful hours searching for bugs.